28 December 2011

Lower Ball Joint - Energy Suspension Dust Boot

Update: Apparently there are mixed reviews on the dust boots. I will give a final feedback after some use on the car ;p 

I had the Energy Suspension Hyper-Flex System Complete Master Set, passed to me from the previous owner :). Some of the bushing were not installed, including the Front Ball Joint Boot Set (pt no. 16.13101). Since I had to replace my ball joint, I decided to installed the Boot Set before installing the lower Ball Joint as the original dust boot tends to wear off easily..


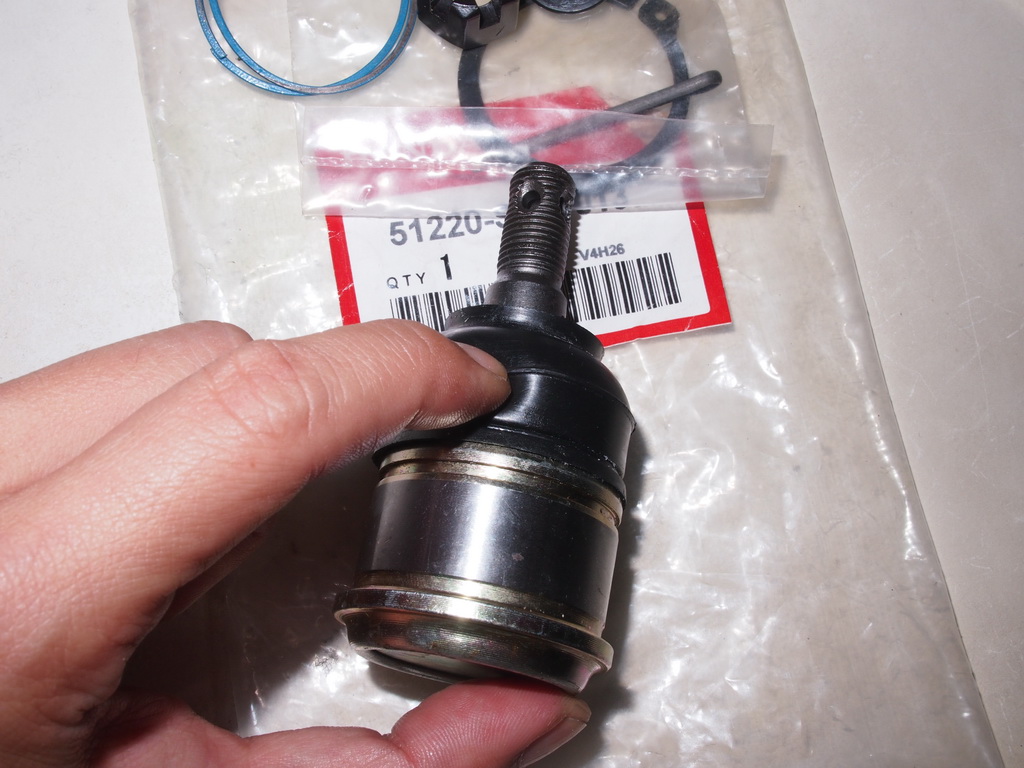
The part no. I got was 51220-SM4-013 and came with a C-Clip.  I understand there is an older part no which does not come with the C-Clip.  But both will fit as well.


It comes with everything u see in the picture, the ball joint, C-Clip, castle nut and the cotter pin.


To replace the dust boot, you have to remove the metal ring holding the boot in place


The boot is kind of soft and feels like its going to tear within one month of usage.


The Energy Suspension Boot on the right is much stiffer


This is how it looks like without the boot


Just slot the Energy Suspension Dust boot over and put it all the way down the shaft.


There is no requirement to install the ring over. Due to the stiffness of the Energy Suspension boot, it is very likely to stay in place.  Hopefully this will lengthen the life of the ball joint.


Piece of advice. Have this done along with your wheel bearing and upper ball joint replacement. Or even wheel studs.


22 December 2011


EG6 Front Lip

My OEM lip suffered some kerb rash due my lousy judgement during U-Turn.  So it had to come off for some repair and respray.

Looks naked without the lip
Mugen Style lip

I have a Mugen Style Lip which I got sometime ago.  It is supposedly made of PU (PolyUrethane) which is really bendable and can go back to the original shape just by heating in the sun.

Anyway, decided to fix it up for the time being till I repair the OEM lip.


Seats Re-wrapped

 This seat came from a 96 prelude. The reason I am using these is because it really comfortable and the lack of the shoulder area makes the interior looks more spacious.  Best of all, they are free!! Given to me by my mechanic.


The 'shifu' Ah How who did the re-wrapped for me. Instead of going back to leather, I have chosen fabric similar to what was used on the SPARCO seats.  So that I will not slide around as much during hard corners ;)

For the locals, the shop is located in Johor Jaya.  Ah How used to work in Singapore, going around to Car Dealer like Borneo Motors, Tan Chong, Motor Image, etc to provide seats wrapping services.


With the re-wrapped seats, the interior now look less outdated :)

20 December 2011

New Windscreen

I removed the windscreen moldings before the paint job so that paint can get to the areas below.


Went to the good people of Automotive Glass Works
Another shot before the old windscreen is removed


New windscreen :)


Removal in progress


Old windscreen removed

New moldings


New glass going in


Completed. The masking tape is holding the glass in place until the adhesive partially cure (1hr).  It will take approximately 4 days to 7 days for it to be fully cure.  Therefore, it means no car wash, window tint and anything that will have force that may shift the windscreen till it is fully cured.


The whole process took about 2 hours to complete.

Thanx to Kelvin and his crew from Automotive Glass Works for the install.  Very professional and friendly people :)

New Paintjob


Where I got it done.  Too bad that I didnt get the chance to take photos of the process of the job.

If u notice, the windscreen mouldings are missing. That is because I am going to get them replaced as the current one has too many chips and the visibility is quite bad when the morning and evening sun shines directly thru the windscreen.


19 December 2011

Missing her already..

Finally gotten down to send her for a paint job (Milano Red) and changing of new windscreen (there were too many chips on the windscreen). Took the chance to send the seats for rewrap (Black Fabric) at the same time.  Nothing for me to work on for the time being...

10 December 2011

Hondata Tuning Setup (More entertaining than ICE!)

Poor man in-car entertainment system :)

It is actually my setup for road tune for the Hondata S300.  I got the idea or rather copy the idea when I came across a article in Option magazine where a Japanese tuning system came with a gamepad for tuning.  Essentially, what I got was a Logitec Gamepad for Windows which allows ALL the buttons and joystick to be programmed.  One button to increase fuel, one button to decrease fuel, one button to upload, one joystick to switch map, one joystick to switch views, etc.  This allows one hand operations when I am doing my road tune.
 

 To have a stable connection to the S300 and for longer road tunes, I got a DC/AC convertor.  (The connection to the S300 tends to break off when running the netbook on batteries only)


For attaching the netbook to the windscreen, I used a window mount kit for netbook. As it does not hold the netbook very well, so I used a 1 foot "bicycle/elastic hook" to secure the netbook to the mount.


This the exact one that I got from DealsExtreme. :)


One problem though, due to the small 10.1" screen of the netbook, you need good eyesight to be able to the see the table.  However, during tuning u dont really need to see the numbers in the table since all u need to know is which RPM and MAP is the engine running at, which will be highlight in the table.

08 December 2011

Hondata S300 Tuning Basic

After messing around with the Hondata S300, there are couple of things that I learnt and found out which may not be cover under the S300 help files.

Before commencing tuning:
1) Chk all sensors are in working order: TPS, MAP, IAT, ECT, Idling Solenoid Valve and RPM.

2) Set your ignition timing with ignition timing gun by adjusting the distributor to 16 Degrees

3) If u decide to run in close loop, then tune it in close loop by setting the Short Term Adjustment to 0% for minimum and maximum under Parameter -> Close Loop Tab. This will prevent the ECU from adjusting the fuel value with reference to the AFR reading. Once the tuning is complete, set the minimum short term adjustment to -30% and maximum to 30%.

The reason being, fuel adjustment in close loop are affected by quite a number of parameters besides basic fueling and ignition. In Open Loop tuning, there are just too many parameter to adjust to ensure it works properly in close loop.  This is why that people are complaining that when they complete tuning in Open Loop and switch back to Close Loop, their AFR readings are very different or not running as desired (usually very lean).  Some of the parameters the affects the fuel inputs are Fuel Compensation and Ignition due to IAT and ECT.

4) ALWAYS tune with Wide-Band AFR sensor!!  Dont even try tuning without this...

5) Try as much as possible to have a constant IAT (Intake Air Temperature) during your tuning.

6) Forget about using the Lambda Target table in the S300 for tuning.  It is inaccurate as it includes the AFR value when u throttle off, which usually will cause the average AFR value to much lower than it is actually is.

What I do when trying to obtain accurate AFR value, is to maintain a constant throttle and hold it till the AFR reading stablises. After which I will adjust the fuel value accordingly.

The guide is mainly for part throttle tuning/cruising. For full throttle tuning, I strongly believe it has to be done on the dyno machine. 

07 December 2011

ACCEL High Out Coil Direct Replacement #11076

Just got these replacement coil from ACCEL

Claimed 20% higher output over stock. It is relatively cheap (US$45 including shipping to Singapore) and its a good time to replace my internal coil.

If you looking for serious upgrade to the ignition system, go for MSD full ignition system instead ($$$).  My intention to keep the stock look and it was claimed that the stock ignition system is good for 600hp ;p.

Comparison between the stock coil and the ACCEL coil

See my post on Distributor Cap and Rotor Swap on how to remove the distributor cap and rotor.

Disconnect the battery first. Then unscrew the two contact points and followed by the two screw on top.
 Just remove the coil and replace the new coil accordingly.  Just reverse the steps and it is done!